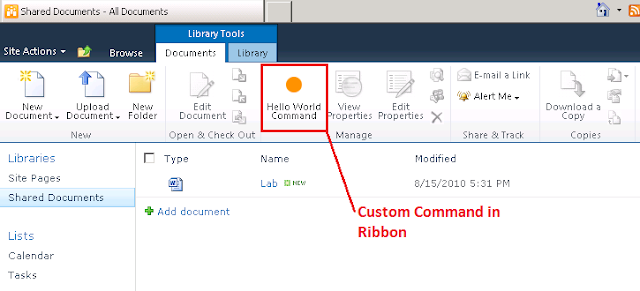
This tutorial shows how to add custom command Button to the Ribbon. This is an introduction to customizing the SharePoint 2010 Ribbon using custom actions.
Lets get started:


Lets get started:
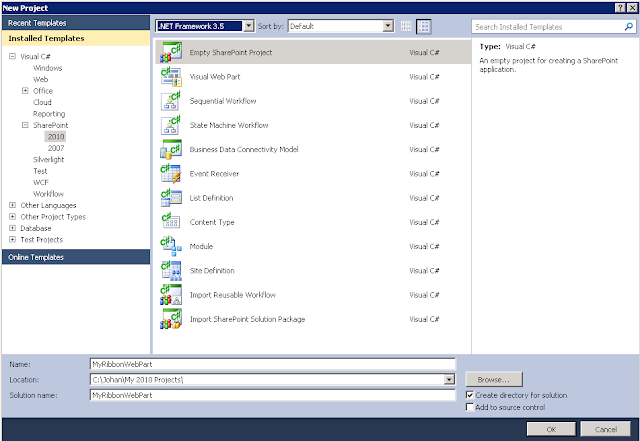
- Create a new Visual Studio 2010 Project.
- Select SharePoint and then Empty SharePoint Project.
- Name the project and click on OK
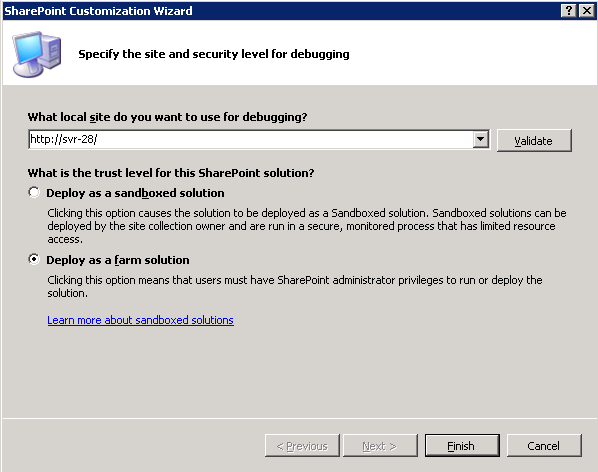
- Specify the site to use for debugging, select "Deploy as farm solution" and click on Finish.
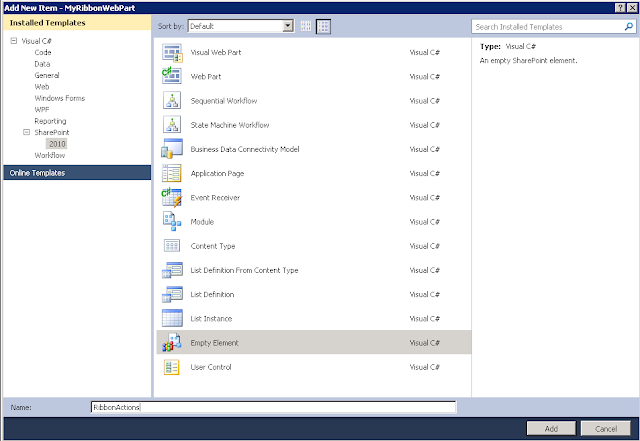
- Using the Solution Explorer, add a new item to the project.
- Select Visual C# --> SharePoint 2010 --> Empty Element.
- Name the element RibbonActions and click on "add"
-
In Elements.xml file that has opened automatically add a
new
element right inside the node and add the following markup. (your project will contain two Elements.xml files. One under MyRibbonWebPart and another under RibbonActions. The changes required here is for the Elements.xml file under RibbonActions)
<Elements xmlns="http://schemas.microsoft.com/sharepoint/">
  <CustomAction
    Id="Hello_world"
    RegistrationType="List"
    RegistrationId="101"
    Location="CommandUI.Ribbon"
    Sequence="5">
    <CommandUIExtension>
      <CommandUIDefinitions>
        <CommandUIDefinition Location="Ribbon.Documents.Manage.Controls._children">
          <Button
             Id="Ribbon.Documents.HelloWorldButton"
             Alt="Hello World"
             Sequence="5"
             Command="Show_HelloWorld"
             Image32by32="/_layouts/images/placeholder32x32.png"
             LabelText="Hello World Command"
             TemplateAlias="o1"/>
        </CommandUIDefinition>
      </CommandUIDefinitions>
      <CommandUIHandlers>
        <CommandUIHandler
          Command="Show_HelloWorld"
          CommandAction="javascript:alert('Hello World!');" />
      </CommandUIHandlers>
    </CommandUIExtension>
  </CustomAction>
</Elements>
- Save the project and build the project.
- In the Solution Explorer, right-click on the project and choose Deploy.
- Save and close the web.config file.
- Navigate to the target SharePoint Site, go to Site Actions -->Site Settings --> Manage Site Features and activate the new feature.
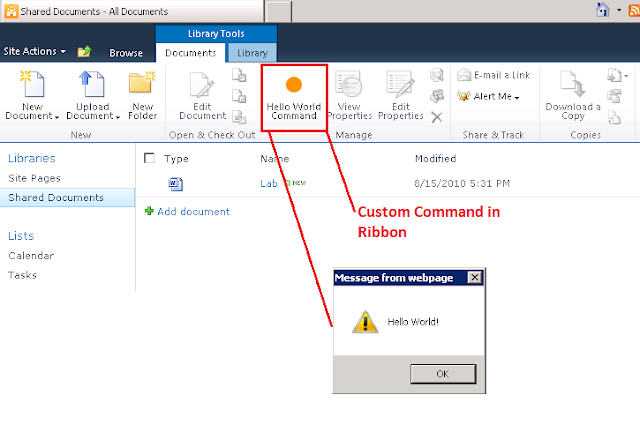
- Navigate to a document library and click on "Documents" group in the Ribbon. Notice the new action item.
- Click on the new custom action to view execution of the javascript.
Referances:
http://msdn.microsoft.com/en-us/library/gg552606%28v=office.14%29.aspx
http://www.sharepointnutsandbolts.com/2010/01/customizing-ribbon-part-1-creating-tabs.html
======================
Below XML file is Elements.xml for Creating seperate Group under existing Tab.
See below Image
xml version="1.0" encoding="utf-8"?>
<Elements xmlns="http://schemas.microsoft.com/sharepoint/">
  <CustomAction
  Id="NLP.Ribbon.CustomGroupAndControls"
  RegistrationId="108"
  RegistrationType="List"
  Location="CommandUI.Ribbon"
  Sequence="20"
  Title="Change Ticker(s)">

    <CommandUIExtension>
      <CommandUIDefinitions>
        <CommandUIDefinition Location="Ribbon.Templates._children">
          <GroupTemplate Id="Ribbon.Templates.NewGroupInExistingTab.NLPCustom">
            <Layout Title ="NLPCustomGroupInExistingTab" LayoutTitle="NLPCustomGroupInExistingTab">
              <Section Alignment="Top" Type="OneRow">
                <Row>
                  <ControlRef DisplayMode="Large" TemplateAlias="CustomButton"/>
                </Row>
              </Section>
            </Layout>
          </GroupTemplate>
        </CommandUIDefinition>
        <CommandUIDefinition Location="Ribbon.ListItem.Scaling._children">
          <MaxSize
          Id="NLP.Ribbon.CustomGroupAndControls.Command.CustomAction"
          Sequence="15"
          GroupId="NLP.Ribbon.CustomGroupAndControls.Command"
          Size="NLPCustomGroupInExistingTab" />
        </CommandUIDefinition>
        <CommandUIDefinition Location="Ribbon.ListItem.Groups._children">
          <Group
            Id="NLP.Ribbon.CustomGroupAndControls.Command"
            Sequence="60"
            Description="NLP"
            Title="NLP"
            Template="Ribbon.Templates.NewGroupInExistingTab.NLPCustom">
            <Controls Id="NLP.Ribbon.CustomGroupAndControls.Command.Controls">
              <Button
                  Id="NLP.Ribbon.CustomGroupAndControls.Command.UpdateButton"
                  Alt="Change existing Ticker(s) to new Ticker(s)."
                  Sequence="10"
                  Command="Update_Button"
                  Image16by16="/_layouts/$Resources:core,Language;/images/formatmap16x16.png"
                  Image16by16Top="-112" Image16by16Left="-224"
                  Image32by32="/_layouts/$Resources:core,Language;/images/formatmap32x32.png"
                  Image32by32Top="-160" Image32by32Left="-32"
                  LabelText="Change Ticker(s)"
                  TemplateAlias="CustomButton" />
            </Controls>
          </Group>
        </CommandUIDefinition>
      </CommandUIDefinitions>

      <CommandUIHandlers>
        <CommandUIHandler
          Command="Update_Button"
          CommandAction="javascript:

          var ItmIDs = getItemIds();

          function getItemIds()
           {
             var itemIds = '';
             var items = SP.ListOperation.Selection.getSelectedItems();
             var item;
             for(var i in items)
             {
               item = items[i];
               if(itemIds != '')
               {
                 itemIds = itemIds + ',';
               }
               itemIds = itemIds + item.id;
             }
             return itemIds;
           };

          var options = {
                url: '/_layouts/NLP.ProjectNameStore.ChangeTicker/
ChangeTickers.aspx?spItems='+ ItmIDs,
                tite: 'Move Documents',
                allowMaximize: false,
                showClose: true,
                width: 800,
                height: 600 };


              SP.UI.ModalDialog.showModalDialog(options);
         "/>
      </CommandUIHandlers>

    </CommandUIExtension>
  </CustomAction>
</Elements>

